"How to brush fur of a koala?" - Step by Step with AERO COLOR® Professional
This artwork on the subject “Fur” was painted by Maria Ilnitskaya, student at the airbrush school Art-Tehnika airbrushing center, St. Petersburg, Russia. Step by step you will see how she works with Schmincke AERO COLOR® Professional.
Material:
A PVC panel, size: 30x48 cm or a painting ground
Schmincke AERO COLOR® Professional: 28101 SUPRA white opaque, 28306 brilliant red, 28405 primary blue cyan, 28502 permanent green, 28702 black
First of all you have to sketch a linear picture, using an usual pencil.
Step 2
Then, the background has to be sprayed with the airbrush, filled with 101 SUPRA-white, opaque and little drops of 702 black.
Step 3
The next step is very important. Using 702 black for shades, the form of the koala is created. For this step, the koala without fur should have the same volume form as with fur.
Step 4
Add a few colors using (306 brilliant red, 405 primary blue cyan, 502 permanent green) in corresponding places.
Step 5
Then, you apply more deep, even distributed shadows with black 702. It is made for setting up the tone for dark spaces between the fur, which will be painted with white color. This dark space is called "inter-fur-space" ("inter-hair-space").
Step 6
After making the koala darker, you fill the airbrush with 101 SUPRA-white. Start spraying the hairs, beginning from more lighter areas.
Step 7
Now you spray "hair by hair", using the airbrush and 101 SUPRA-white only. It is liquid and opaque, so it is very comfortable for spraying fur.
Step 8
You move from light areas to darker ones, filling the whole koala with fur.
Step 9
Again you "walk" across the whole koala, adding some more hair, to reach the needed fur density.
Step 10
Then the koala should be glazed with a thin layer of 405 primary blue cyan to give the fur a slightly bluish tone.
Step 11
After glazing, you should add again more hair on the whole surface of the koala. Such steps help to draw fur with maximum realism and volume.
Tip
Probably, you noticed the fact that the eyes of the koala were covered all the time. At our school we always paint this way, specifically for the reason to reach a critical view of the characteristic form. When you paint the eyes in an earlier step, the animal becomes alive right in that moment, giving the feeling that it looks already fine even it is not still perfect. Therefore, we are brushing the eyes in the last moment in a stage when - even without eyes - the form looks convincingly.
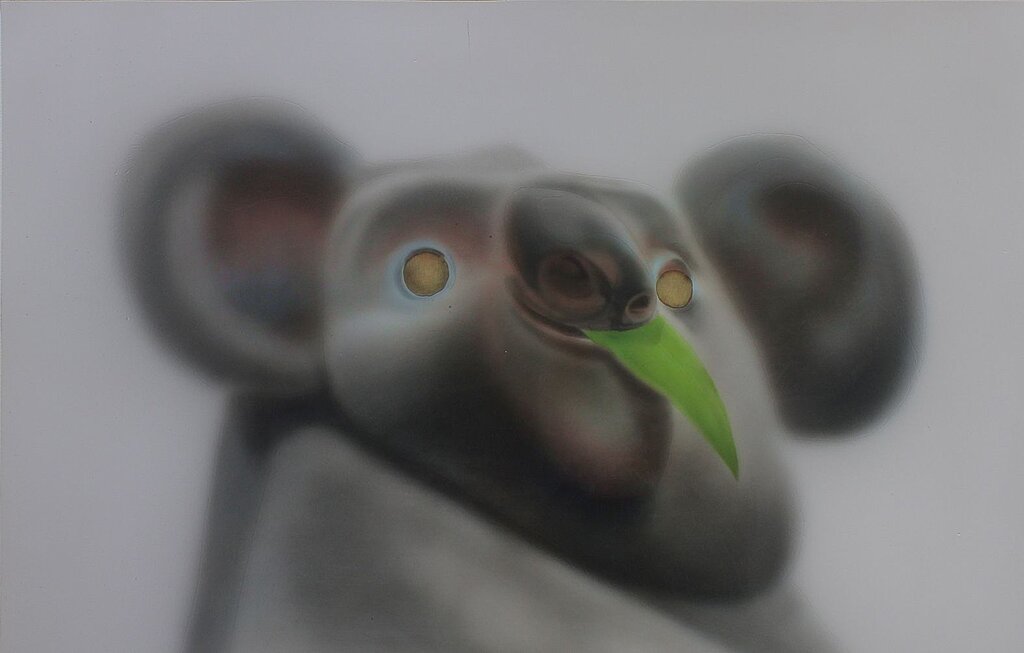
Step 12
Before you finish the eyes, the nose and the leaf textures should be done first. And only after that we can uncover theeyes and and spray them.
This is the final result of the koala, covered with Schmincke AERO final laquer glossy (50610).
With permission of Sam Nassour, this koala was painted by our student, but in airbrushing technique. This image was chosen on purpose, because it contains big amounts of different fur textures.
The artist
Maria Ilnitskaya, student of the airbrush school Art-Tehnika, St. Petersburg, Russia, while brushing this koala.